Tuesday, September 27, 2016

Strip Coaster


Fabric:
     (20) 1 1/2" x 2 1/2" strips of Background fabric
     (5) 1 1/2" x 3 1/2" strips of 4 Main fabrics
     (1) 5" square of each 4 Main fabrics (Backing Squares)
     (4) 5" squares of flannel or light batting (pre-wash flannel)


Use a 1/4" seam allowance unless otherwise stated.

Step 1:
Right-sides together stitch one main fabric to one background fabric on the short side.  Do this for all 20 pieces.


Step 2:
Now stitch the opposite short sides together to form a tube.


It may seem a little weird if you've never used this technique before, but It will work out!


When you are done your tubes should look like this.


Step 3:
Now randomly snip the background fabric of your tubes so that they can open up and lie flat.
Tip 1: Use a steady hand so your fabric is straight and you don't have to trim off later -making a smaller coaster.
Tip 2: Cut at least 3/8" away from a seam line that way the background shows after the coaster is made.


Step 4:
Press your tubes open so they are strips.  Press towards the dark.


Step 5:
(Missing Picture) Arrange your strips in 4 sets of five and stitch the strips in each set together to form 4 rectangles. (Should look like the right square in step 6 picture.)

Step 6:
Square up our rectangles to be 5" square. (This will require cutting about 1/4" off each first and last strip.)


Step 7:
Create your coaster sandwiches by placing your backing square and coaster top right-sides together, and then placing your flannel square on top of those.  Stitch around all sides leaving an opening for turning at the bottom. Do this for all 4 sets.


Step 8:
Clip all your corners and turn the coasters right-side out so that the flannel is on the inside. Press flat with the seam allowance from the opening tucked in.  Then using a smaller seam allowance top-stitch near the edge of each coaster to close it.


Sunday, September 11, 2016

A frightfully good time for Mayhem

Hello Mayhem Makers

I am going to guest blog today for Quilting Mayhem. For those of you who have had the pleasure of shopping in person at Quilting Mayhem might know me, Katie. I love Halloween! It is my favorite time of the year. The weather is changing and the crisp, cool air nips at your face in the morning. The smell of a wood burning fireplace mixes in with the breeze. It is perfect quilting weather! I have always had a thing for fall weather and Halloween. I wanted to share with you my recipe for Brains! Red Velvet cookie Brains, that is.

Gather your ingredients:

One Box Red Velvet Cake Mix
Two Eggs
One teaspoon Vanilla Extract
1/3 of a cup of Butter melted
1 1/2 cups of Powdered Sugar (set aside)


Open the boxed cake mix and place in the bowl.

Use a whisk to break up any clumps in the cake mix.

Add eggs to the slightly cooled melted butter and whisk together adding the vanilla just after combined. 


 Add butter, eggs and vanilla mixture to the cake.


 Fold in mixture until just combined. You do not want to over mix.


In a separate dish like this one. Smallish and shallow add the powdered sugar. You could do this step in a plastic bag to shake coat the cookies. I find that I prefer to roll them in the dish for extra sugar coating.


If you have a small cookie scoop that would be helpful but I just used a small single spoon. Roll the cookie dough into an approximate 1" long by 1/2" roll.


Roll in powdered sugar until well coated.


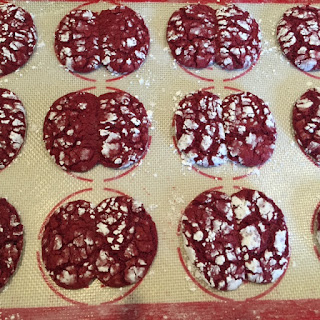
This is a picture of my first batch. I didn't space them far enough apart for the brain hemispheres to show up after baking. Make sure to space the rolls at least 1/2" apart.


 Yummy, yummy brains fresh from the oven.
Let cool for a few minutes before removing from cookie sheet to a cooling rack.

I hope you enjoy.

If you are in Snohomish, WA on Saturday September 17th, 2016 for the Zombie Walk. Please stop in to say hi in your finest zombie attire.

Tuesday, September 6, 2016

Composition Notebook Cover Free Pattern

In honor of Self-Improvement month we've made you a free pattern!


This simple pattern allows you to customize your composition books. What better way to improve yourself than to give yourself a pretty, creative place to keep your ideas, dreams and thoughts!

You can also use the pattern to make fun gifts for your friends in family!

Monday, August 8, 2016

Infinity Scarf Tutorial

One of my go to projects for an easy gift to make is an infinity scarf.  With a yard of fabric and 30 minutes I have a home made accessory that I can either custom make to go with my wardrobe or make one as a gift for a friend.

Follow these step by step instructions to make your own infinity scarf.

Supplies Needed:
1 yard fabric such as double gauze, cotton lawn, rayon, or light weight quilters cotton.
Coordinating cotton thread
Sewing machine with basic tools
Rotary cutter with new blade
Cutting mat
6 1/2" x 24 1/2" or 8 1/2" x 24 1/2" ruler
Scissors
Pins

Ready to go?

I used a double gauze from Cotton + Steel called Trinket.  I like making scarves from double gauze because they are lightweight and soft to wear.  Who couldn't love these smiling daisies??


Start out getting your fabric trimmed up and ready to sew.
1. Fold fabric in half matching selvage to selvage.
2. Trim both short sides so you have clean straight edges.
3. Cut the length of the fabric at the selvage edge then cut fabric length wise at the fold so you have two pieces approx. 20" x 36".


4. Match the two short sides right sides together and sew 3/8" seam and press open.
5. You will now have one long piece of fabric approx. 20" x "71"
6. Fold fabric in half lengthwise with right sides together. Match the edges together and pin.
7. Sew 3/8" down the long side. This will create a long tube.


8. On both short ends place a pin at the seam and the opposite side from the seam marking the half way point.
9. Reach in the fabric tube, grab the far end and pill the fabric into the tube. Careful to not lose the pins or stick yourself.
10. Bring both short sides right sides together.  Here is where you want to put a twist in your infinity scarf.
11. Rotate the inside short end and match the seam to the pinned half way point of the outside short end and pin.
12. Pin the outer seam to the where the inside halfway pin is.


13. Place a few more pins around edge leaving a 4" opening.
14. Sew 3/8" seam around the edge leaving the 4" opening. Stay stitch at the beginning and end.
15. Pull the right side of the scarf out of the 4"opening until the scarf is all the way out.


16. Whip stitch the 4" opening closed.


Voila!  You have an amazing infinity scarf made by you.

Monday, May 23, 2016

Market Mayhem from Salt Lake City 2016

Fresh home from Spring Quilt Market and I have so much in my head of wonderful promotions, events, programs, projects and patterns we want to do.  As we learn and grow we want to share our passion and information with you. I thought what better way to share than to write a blog for you. I will try not to make it a grand novel but give some you key ideas of what is coming for you at the shop.

Lori Holt Booth

Quilt Market overview before opening

Dear Stella Booth


One of the key things all of us at the shop like to do it share our ideas and knowledge.  Between all of us at the store we have over 100 years of quilting and sewing experience.  That's a lot of information we have to share.  I am fortunate to have such an amazing staff full of experience.  In the next several months you will see us strive to not only share with you when you ask for help but also create some wonderful promotions to teach you tips and tricks to make your quilting and sewing experiences even better. We all strive to learn more and do better in what we make so why not give you some events that will focus on doing just that and for FREE!!


Latifah Saffir 


Classes are something I always get excited about because it focuses on a pattern or project that we love.  All of us in the shop have our favorite styles and types of projects whether they be traditional or modern quilts, bags, clothes, housewares, etc.  Fortunately we all take turns teaching classes for these types of projects we love.  You will be seeing even more classes coming in a variety of projects. If there is something you would like to see us teaching please let us know.  You never know it might be one we have coming or it may be one we can create for you.


Sassafras Booth with their new minis

You can't do classes without having clubs and block of the months.  You will be seeing even more of these coming in the fall PLUS we are going to start a Saturday Sampler program AND a new concept of block swap.  We are so excited for this I can't contain myself. We are hammering out the details and will be launching these soon.


I know a lot of you like going on retreat and attending quilting and sewing events.  While my dream is to be able to provide you wonderful retreats some day, I know that we can at least achieve some mini retreats and events in the shop.  We have an amazing Christmas in July retreat coming and information is one the website calendar now.  We are creating swag bags and even more freebies as we get closer to the event.  You won't want to miss our first mini retreat in the shop.  There will be goodies galore so sign up now to reserve your space. My hopes is to do more of these types of events for you so please feel free to share your ideas of what you would like to see.


Almost to the end of all the excitement. Fabric is of course our true addiction and what inspires us to make and create wonderful things.  We went crazy finding all kinds of lovely fabric and maybe even a little overboard but really there is no such thing as too much fabric (even though my husband would disagree).  So please keep coming to visit us whether it be in the shop or online.  We always have new fun bright fabrics, patterns and notions coming in for you to love as much as we do.


My final words to say are Thank You!!  To all of you who support me in my dream. To those of you who visit my shop and share my passion.  Especially to those of you who tell your friends and even strangers sometimes that they need to come see us.  Without all of you I could not be doing what I am doing today.  I truly appreciate all of you who have "Embraced the Mayhem" and truly keep us going. Please keep visiting, keep sharing and tell everyone you know what wonderful things we have to offer to everyone.


Tuesday, May 3, 2016

Mendocino Giveaway

We are so excited about Mendocino! The full collection has been in the shop and online (here) a couple weeks now, but this week we will be receiving the trunk show to go with it!!

Come by the shop later this week to see the "Anemone" Quilt in person and to pick up your quilt and pillow case kit bundle. (You can also get the bundle on our website here.)


In the meantime check out our Mendocino giveaway!!!


One lucky winner will win a bundle of 8-fat quarters from the line.


There are multiple ways to gain entries into the giveaway. You can even gain an additional entry for each day if you share the giveaway on Instagram using hashtag #qmmendocino! Be sure to follow @quilting_mayhem! (You can use this badge below.)

Entries close on May 9th. We will announce the winner in our newsletter (sign-up here) and on our Facebook Page on Tuesday, May 10th.

a Rafflecopter giveaway

Happy Anniversary!!

Can you believe it has been a year already?? I can't.  So many things have happened since then.  The first day we opened is just a blur.  I want to thank all of you who have helped me along my journey.  I have made so many new sewing friends.  I am truly thankful.

Just over a year ago Katie joined me in my crazy dream to open and amazing quilt shop in Snohomish.  She has been my rock, my sanity and the devil on my shoulder.  She met me at the shop every day to cut and prep all the bolts of fabric that had been waiting in my home.  Alix soon joined us in dragging bolts from my house to the class room.  Unwrapping bolt upon bolt with my boys Alex and Zach.  The day we finally had the bookcases ready you'd think we won the lottery.  Katie and I were so happy every day we came in and got to look at our color wall.  We were like kids in a candy store.  Fabric candy that its.

Here are a few pics from the beginning:


My house was a little taken over before we got the store location.  Once we found the Snohomish location I knew it was meant to be.  Here are some pictures from how the shop looked during remodel.


Who knew shelving would make us so giddy with joy??  The day we were able to start building the color wall we were head over heels in love.  My poor contractor Bryan thought we were nuts.


Aren't these just the prettiest things you have ever seen?

Soon we had our opening day.  What a insane day that was figuring out the computer system and getting everyone through the store. My poor husband patiently dealing with all the problems for us and continues to put up me when we have "issues".  I have to give a shout out to my mother, Donna, who was there for me in the early days and continues to help out when I need her.  Her love and support has truly been wonderful.  The first day was a wonderful day filled with smiles and budding friendships and it continues to be that way.  These are just a few of the reasons I am glad I made the decision to open my own shop.


Since those days we have added even more fabric.  Who knew I'd figure out how to fit 500 more bolts into this place??  We have added more staff that I couldn't do without.  Judi, Trina, Chelsey and Allison all have their different talents and skills that they bring to the cutting table.  These lovely ladies keep me inspired and make sure everything keeps rolling.


Left to Right: Chelsey, Allison, Mindy, Alix, Judi, Katie, Donna and Trina. (We even know how to color coordinate without even trying.)

Classes are still continuing to grow as we pick up more instructors and offered more types of classes. Jane, Lori, Krista, Joyce, Jackie, Connie, Sheila, Sydney, Kathy, Melanie and Donna have all been wonderful to work with and great teachers to have in the shop.  If you haven't gotten to take a class yet check out our website to see what all we have to offer.

I can't thank everyone enough for all the love and support.  Snohomish is our home.  Mayhem is our life and we are here to stay.